Interface: Difference between revisions
Jump to navigation
| (119 intermediate revisions by 7 users not shown) | |||
| Line 1: | Line 1: | ||
[[Category:Help]] | |||
=== HUD / Top Bar === | |||
In the HUD you have access to the most important features. | |||
[[File:hud.png|750px]] | |||
{| | |||
!Number | |||
!Name | |||
!Description | |||
|- | |||
|align=center|1 | |||
|align=center|Builders | |||
|Builders are responsible for constructing and upgrading buildings. Click on the green + to unlock more builders. | |||
|- | |||
|align=center|2 | |||
|align=center|Population | |||
|This shows your available population. | |||
|- | |||
|align=center|3 | |||
|align=center|Culture | |||
|This shows your available Culture. | |||
|- | |||
|align=center|4 | |||
|align=center|Culture Bonus | |||
|This shows if you have a Culture Bonus and its possible benefits. | |||
|- | |||
|align=center|5 | |||
|align=center|Knowledge Points | |||
|[[Knowledge Points|'''Knowledge Points''']] (KP) are a special kind of currency. They are assembled in this bar. You can acquire them on several occasions and they have many uses. | |||
|- | |||
|align=center|6 | |||
|align=center|Goods Overview | |||
|A list of your available Goods. | |||
|- | |||
|align=center|7 | |||
|align=center|Other Resources Overview | |||
|A list of your Other Resources, including your present Settlement Resources. | |||
|- | |||
|align=center|8 | |||
|align=center|Coins | |||
|Your current amount of Coins. | |||
|- | |||
|align=center|9 | |||
|align=center|Supplies | |||
|Your current amount of Supplies. | |||
|- | |||
|align=center|10 | |||
|align=center|Diamonds | |||
|Your current available Premium currency. Click on the green + to buy more Diamonds. | |||
|- | |||
|} | |||
==== Ressources Overview ==== | |||
By clicking on the yellow button in the top menu [[File:Guestrace.png|25px]], you can see all the other resources of the game including resources from Crafting and also your current chapter resources. | |||
In this Overview you can see : | |||
[[File:ROverviewmenu.png|500px|center]] | |||
* In the '''left section''' : You can see all the Crafting resources. Including the Royal Restorations, the Combining Catalysts, and also Blueprints. | |||
* In the '''middle section''' : You can see all resources which are not Goods Resources or Chapter specific resources. For example Orcs, Mana, Seeds, and Unurium. | |||
* In the '''right section''' : You can see all resources for the '''current chapter'''. | |||
=== Player Profile === | |||
[[File:profiletab.png]] | |||
{| | |||
!Number | |||
!Name | |||
!Description | |||
|- | |||
|align=center|1 | |||
|align=center|Profile Picture | |||
|Click here to edit your profile avatar and your city name. | |||
|- | |||
|align=center|2 | |||
|align=center|User Name | |||
|This is your user name. | |||
|- | |||
|align=center|3 | |||
|align=center|Ranking | |||
|This shows your position in the ranking. Click on it to access all rankings. | |||
|- | |||
|align=center|4 | |||
|align=center|Messages | |||
|Click here to receive and send in-game messages. | |||
|- | |||
|align=center|5 | |||
|align=center|Notifications | |||
|Click here to see notifications about your received Neighborly Help and who has accepted your offers in the Trader. | |||
|- | |||
|align=center|6 | |||
|align=center|Fellowship | |||
|Click here to found your own fellowship or to access your fellowship window. | |||
|- | |||
|align=center|7 | |||
|align=center|News Window | |||
|Click here to see the latest news including Release Notes, Events, Forum Links and more). | |||
|} | |||
=== Options === | |||
[[File: | [[File:Settings.png|left]] | ||
{| | {| | ||
!Number | !Number | ||
!Name | !Name | ||
!Description | !Description | ||
|- | |- | ||
|align=center|1 | |align=center|1 | ||
|align=center| | |align=center|Logout | ||
| | |By clicking here you can log out of the game. | ||
|- | |- | ||
|align=center|2 | |align=center|2 | ||
|align=center| | |align=center|Zoom | ||
|This allows you to zoom in and out on your City Map. | |||
| | |||
|- | |- | ||
|align=center|3 | |align=center|3 | ||
|align=center| | |align=center|Full Screen | ||
|Click here to access full screen mode. | |||
| | |||
|- | |- | ||
|align=center|4 | |align=center|4 | ||
|align=center| | |align=center|Help | ||
|Shortcut to forum and game support. | |||
| | |||
|- | |- | ||
|align=center|5 | |align=center|5 | ||
|align=center| | |align=center|Music | ||
|This allows you to turn the background music on and off. | |||
| | |||
|- | |- | ||
|align=center|6 | |align=center|6 | ||
|align=center| | |align=center|Sounds | ||
| | |This allows you to turn sound on and off. | ||
|- | |- | ||
|align=center|7 | |align=center|7 | ||
|align=center| | |align=center|Advanced Settings | ||
|This allows you to manage several other settings. <br>See below. | |||
| | |||
|- | |- | ||
|} | |||
== | === Advanced Settings=== | ||
[[File:Advanced_settings_tab1.png|center]] | |||
{| style="text-align: center" | |||
!colspan="2"|Confirm tab | |||
|- | |||
|Setting | |||
|Description | |||
|- | |||
|Show Diamond confirmation | |||
|Click here to open a Confirmation Box that you are going to spend Diamonds after clicking on a blue button. Prevents accidental use of Diamonds | |||
|- | |||
|Show unboosted Manufactories confirmation | |||
|Click here to open a confirmation box when you want to build a manufactory for which your city don't have a relic boost. | |||
|} | |||
[[File:Advanced_settings_tab2.png|center]] | |||
You can | {| style="text-align: center" | ||
!colspan="2"|Graphics tab | |||
|- | |||
|City graphic quality | |||
|Can be set to Low, Medium or High: <br> <br> '''Low:''' You can lower the graphical effects in the city with this option in case you experience lag in the city. You will see static buildings in your city. <br> '''Medium:'''Your city's buildings will be animated, the city's grounds will contain decorations and you will be able to see the Ancient Wonders Counterparts. <br> '''High:''' On top of the mentioned above you will also see the citizens walking around the your city | |||
|- | |||
|Battle graphic quality | |||
|Can be set to Low, Medium or High | |||
|- | |||
|Toggle atmospheric effects | |||
|Click here to disable the blue mist and cloud shadows over your city. It may speed up some older computers | |||
|} | |||
[[File:Advanced_settings_tab3.png|center]] | |||
{| style="text-align: center" | |||
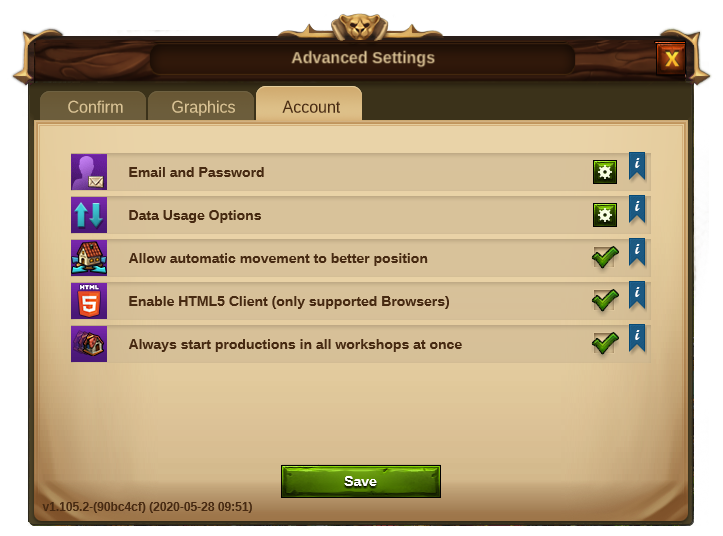
!colspan="2"|Account tab | |||
|- | |||
|Email and Password | |||
|Click here to validate your email or change your password | |||
|- | |||
|Data Usage Options | |||
|Opens a new web page of further game and data options. <br>See below | |||
|- | |||
|Always start productions in all workshops at once | |||
|Applies the check button to idle workshops automatically, so that all workshops can be set in one go | |||
|- | |||
|Always start all possible productions in upfront cost buildings | |||
|When starting a manufactory or settlement production, you can choose to start as many of the same productions as possible in idlebuildings of the same type and level. With this setting you can toggle the default setting between single productions and mass production. | |||
|} | |||
[[File: | ====Data Usage Options==== | ||
[[File:DataUsageOptions.png|center]] | |||
Opens a new page to handle personal data relating to your game account. Includes: | |||
* Receive e-mails about game events, features and offers as well as news about our other games | |||
* Receive push notifications on your mobile device about game events, features and offers | |||
* Allow social network and advertising partner interaction | |||
* Allow third party custom video advertising | |||
Also allows you to begin to delete your account by linking to the "Goodbye Tool". | |||
== | === Main Menu === | ||
[[File: | [[File:Bottom_menu.png|center|Bottom Menu]] | ||
{| | |||
!Number | |||
!Name | |||
!Description | |||
|- | |||
|align=center|1 | |||
|align=center|Sell Mode | |||
|Most of your Buildings can be sold. Click here to enable the Sell Mode. | |||
|- | |||
|align=center|2 | |||
|align=center|Move Mode | |||
|Clicking the move button and then a building, will attach that building to the mouse cursor. A grid is shown and the building area is highlighted in green if the position is valid for the building and red if not. | |||
|- | |||
|align=center|3 | |||
|align=center|Buildings Menu | |||
|Clicking the buildings button in the bottom menu opens the buildings menu. Buildings are sorted into different categories and you can choose them via tabs. | |||
|- | |||
|align=center|4 | |||
|align=center|Research Menu | |||
|Click here to enter the Research Menu and research new technologies. | |||
|- | |||
|align=center|5 | |||
|align=center|World Map | |||
|Click here to enter the World Map, explore it, collect Relics and visit other players. It will also allow you to enter the tournament provinces. | |||
|- | |||
|align=center|6 | |||
|align=center|Trader | |||
|Click here to access the Trader and trade your Goods with other players. | |||
|- | |||
|align=center|7 | |||
|align=center|Ancient Wonders' Menu | |||
|Click here to access all [[Ancient Wonders]]. By hovering this button you will also see the overview of your Rune Shards. | |||
|- | |||
|align=center|8 | |||
|align=center|Inventory | |||
|Here you can access your Enchantments, Instants and any buildings you get from events and special occasions (Summonings). | |||
|- | |||
|align=center|9 | |||
|align=center|Spire of Eternity | |||
|From Chapter 3 in Research you can access the '''[[Spire of Eternity]]''' event from Sunday to Friday every week. This icon appears during the event. | |||
|- | |||
|align=center|10 | |||
|align=center|Crafting | |||
|Here you can go directly to the '''[[Magic_Academy#Crafting|Crafting]]''' tab of your Magic Academy.<br> Note: If your Crafting is not active, it appears as [[File:Crafting_idle.png]] | |||
|} | |||
===Shortcut Keys === | |||
To speed up some of your actions in Elvenar a few Shortcut Keys are available. Note that the hotkeys won’t work when a text field is in focus. | |||
{| | |||
!Shortcut Key | |||
!Description | |||
|- | |||
|align=center|Escape | |||
|Close an open window or disable the Sell or Move mode | |||
|- | |||
|align=center|C | |||
|Return to City | |||
= | |- | ||
|align=center|W | |||
|Go to the World Map | |||
|- | |||
|align=center|B | |||
|Open the Buildings Menu | |||
|- | |||
|align=center|R | |||
|Open the Research Tree | |||
|- | |||
|align=center|T | |||
|Open the Trader window | |||
|- | |||
|align=center|M | |||
|Open the Message Window | |||
|- | |||
|align=center|N | |||
|Open the Notifications window | |||
|- | |||
|align=center|H | |||
|Open the Ranking Window | |||
|- | |||
|align=center|A | |||
|Open the Ancient Wonders' Menu | |||
|- | |||
|align=center|F | |||
|Open the Fellowship Window | |||
|- | |||
|align=center|I | |||
= | |Open the Inventory window | ||
|- | |||
|align=center|S | |||
|Open the Relic page in the Main Hall | |||
|- | |||
|align=center|E | |||
= | |Activated the Neighbourly Help | ||
|- | |||
|align=center|L | |||
|Open the confirmation field for Logout | |||
|- | |||
|align=center|Num. 1-8 | |||
|In a province, start each encounter, (includes a Tournament province, 1-4) | |||
|- | |||
|align=center|Num. 1-6 | |||
|In Workshops, start a production. (Where 1 is the shortest production time and 6 is the longest) | |||
|- | |||
|align=center|Num. 1-5 | |||
|In Military Buildings, start training. (Where 1 is the left unit and 5 is the right unit) | |||
= | |||
= | |||
| | |||
| | |||
|- | |- | ||
| | |align=center|Num. 1-4 | ||
| | |In Magic Academy, start an Enchantment production. (Where 1 is the left Enchantment and 4 is the right) | ||
|- | |- | ||
| | |align=center|Num. 1-4 | ||
| | |In Manufactories, start a production. (Where 1 is the shortest production time and 4 is the longest) | ||
|- | |- | ||
| | |align=center|Arrows | ||
| | |You can use the arrow keys to navigate around the World Map | ||
|- | |- | ||
| | |align=center|Arrows | ||
| | |In windows that have multiple pages, use the Left arrow key to go to the previous page and Right arrow to go to the next page. | ||
| | |||
|- | |- | ||
| | |align=center|Shift+Arrows | ||
| | |In windows that have multiple pages, use Shift+Left arrow to go to the first page and Shift+Right arrow to go to the last page. | ||
|- | |- | ||
| | |align=center|Tab key | ||
| | |In windows that have multiple tabs, use the Tab key to jump to the next tab and Shift+Tab to go to the previous tab. | ||
|- | |- | ||
| | |align=center|+ | ||
| | |You can use + to zoom in your City view | ||
|- | |- | ||
| | |align=center| - | ||
| | |You can use - to zoom out your City view | ||
| | |||
|} | |} | ||
Latest revision as of 19:22, 10 January 2023
HUD / Top Bar
In the HUD you have access to the most important features.
| Number | Name | Description |
|---|---|---|
| 1 | Builders | Builders are responsible for constructing and upgrading buildings. Click on the green + to unlock more builders. |
| 2 | Population | This shows your available population. |
| 3 | Culture | This shows your available Culture. |
| 4 | Culture Bonus | This shows if you have a Culture Bonus and its possible benefits. |
| 5 | Knowledge Points | Knowledge Points (KP) are a special kind of currency. They are assembled in this bar. You can acquire them on several occasions and they have many uses. |
| 6 | Goods Overview | A list of your available Goods. |
| 7 | Other Resources Overview | A list of your Other Resources, including your present Settlement Resources. |
| 8 | Coins | Your current amount of Coins. |
| 9 | Supplies | Your current amount of Supplies. |
| 10 | Diamonds | Your current available Premium currency. Click on the green + to buy more Diamonds. |
Ressources Overview
By clicking on the yellow button in the top menu ![]() , you can see all the other resources of the game including resources from Crafting and also your current chapter resources.
, you can see all the other resources of the game including resources from Crafting and also your current chapter resources.
In this Overview you can see :
- In the left section : You can see all the Crafting resources. Including the Royal Restorations, the Combining Catalysts, and also Blueprints.
- In the middle section : You can see all resources which are not Goods Resources or Chapter specific resources. For example Orcs, Mana, Seeds, and Unurium.
- In the right section : You can see all resources for the current chapter.
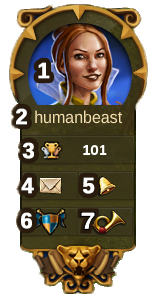
Player Profile
| Number | Name | Description |
|---|---|---|
| 1 | Profile Picture | Click here to edit your profile avatar and your city name. |
| 2 | User Name | This is your user name. |
| 3 | Ranking | This shows your position in the ranking. Click on it to access all rankings. |
| 4 | Messages | Click here to receive and send in-game messages. |
| 5 | Notifications | Click here to see notifications about your received Neighborly Help and who has accepted your offers in the Trader. |
| 6 | Fellowship | Click here to found your own fellowship or to access your fellowship window. |
| 7 | News Window | Click here to see the latest news including Release Notes, Events, Forum Links and more). |
Options
| Number | Name | Description |
|---|---|---|
| 1 | Logout | By clicking here you can log out of the game. |
| 2 | Zoom | This allows you to zoom in and out on your City Map. |
| 3 | Full Screen | Click here to access full screen mode. |
| 4 | Help | Shortcut to forum and game support. |
| 5 | Music | This allows you to turn the background music on and off. |
| 6 | Sounds | This allows you to turn sound on and off. |
| 7 | Advanced Settings | This allows you to manage several other settings. See below. |
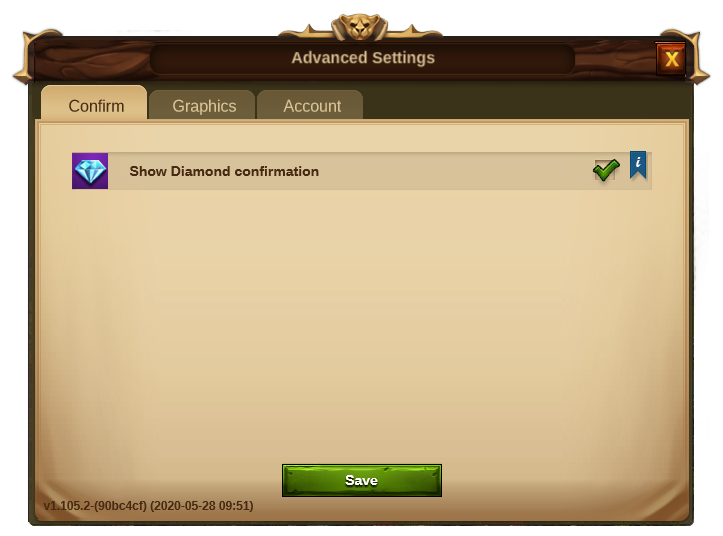
Advanced Settings
| Confirm tab | |
|---|---|
| Setting | Description |
| Show Diamond confirmation | Click here to open a Confirmation Box that you are going to spend Diamonds after clicking on a blue button. Prevents accidental use of Diamonds |
| Show unboosted Manufactories confirmation | Click here to open a confirmation box when you want to build a manufactory for which your city don't have a relic boost. |
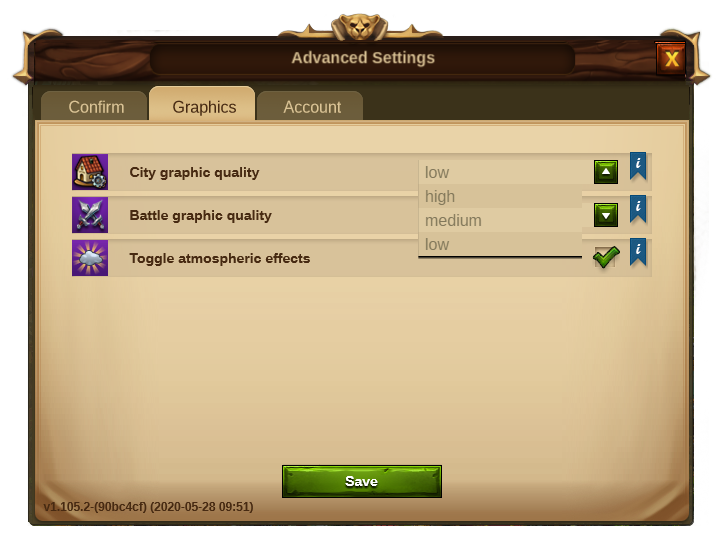
| Graphics tab | |
|---|---|
| City graphic quality | Can be set to Low, Medium or High: Low: You can lower the graphical effects in the city with this option in case you experience lag in the city. You will see static buildings in your city. Medium:Your city's buildings will be animated, the city's grounds will contain decorations and you will be able to see the Ancient Wonders Counterparts. High: On top of the mentioned above you will also see the citizens walking around the your city |
| Battle graphic quality | Can be set to Low, Medium or High |
| Toggle atmospheric effects | Click here to disable the blue mist and cloud shadows over your city. It may speed up some older computers |
| Account tab | |
|---|---|
| Email and Password | Click here to validate your email or change your password |
| Data Usage Options | Opens a new web page of further game and data options. See below |
| Always start productions in all workshops at once | Applies the check button to idle workshops automatically, so that all workshops can be set in one go |
| Always start all possible productions in upfront cost buildings | When starting a manufactory or settlement production, you can choose to start as many of the same productions as possible in idlebuildings of the same type and level. With this setting you can toggle the default setting between single productions and mass production. |
Data Usage Options
Opens a new page to handle personal data relating to your game account. Includes:
- Receive e-mails about game events, features and offers as well as news about our other games
- Receive push notifications on your mobile device about game events, features and offers
- Allow social network and advertising partner interaction
- Allow third party custom video advertising
Also allows you to begin to delete your account by linking to the "Goodbye Tool".
Main Menu
| Number | Name | Description |
|---|---|---|
| 1 | Sell Mode | Most of your Buildings can be sold. Click here to enable the Sell Mode. |
| 2 | Move Mode | Clicking the move button and then a building, will attach that building to the mouse cursor. A grid is shown and the building area is highlighted in green if the position is valid for the building and red if not. |
| 3 | Buildings Menu | Clicking the buildings button in the bottom menu opens the buildings menu. Buildings are sorted into different categories and you can choose them via tabs. |
| 4 | Research Menu | Click here to enter the Research Menu and research new technologies. |
| 5 | World Map | Click here to enter the World Map, explore it, collect Relics and visit other players. It will also allow you to enter the tournament provinces. |
| 6 | Trader | Click here to access the Trader and trade your Goods with other players. |
| 7 | Ancient Wonders' Menu | Click here to access all Ancient Wonders. By hovering this button you will also see the overview of your Rune Shards. |
| 8 | Inventory | Here you can access your Enchantments, Instants and any buildings you get from events and special occasions (Summonings). |
| 9 | Spire of Eternity | From Chapter 3 in Research you can access the Spire of Eternity event from Sunday to Friday every week. This icon appears during the event. |
| 10 | Crafting | Here you can go directly to the Crafting tab of your Magic Academy. Note: If your Crafting is not active, it appears as |
Shortcut Keys
To speed up some of your actions in Elvenar a few Shortcut Keys are available. Note that the hotkeys won’t work when a text field is in focus.
| Shortcut Key | Description |
|---|---|
| Escape | Close an open window or disable the Sell or Move mode |
| C | Return to City |
| W | Go to the World Map |
| B | Open the Buildings Menu |
| R | Open the Research Tree |
| T | Open the Trader window |
| M | Open the Message Window |
| N | Open the Notifications window |
| H | Open the Ranking Window |
| A | Open the Ancient Wonders' Menu |
| F | Open the Fellowship Window |
| I | Open the Inventory window |
| S | Open the Relic page in the Main Hall |
| E | Activated the Neighbourly Help |
| L | Open the confirmation field for Logout |
| Num. 1-8 | In a province, start each encounter, (includes a Tournament province, 1-4) |
| Num. 1-6 | In Workshops, start a production. (Where 1 is the shortest production time and 6 is the longest) |
| Num. 1-5 | In Military Buildings, start training. (Where 1 is the left unit and 5 is the right unit) |
| Num. 1-4 | In Magic Academy, start an Enchantment production. (Where 1 is the left Enchantment and 4 is the right) |
| Num. 1-4 | In Manufactories, start a production. (Where 1 is the shortest production time and 4 is the longest) |
| Arrows | You can use the arrow keys to navigate around the World Map |
| Arrows | In windows that have multiple pages, use the Left arrow key to go to the previous page and Right arrow to go to the next page. |
| Shift+Arrows | In windows that have multiple pages, use Shift+Left arrow to go to the first page and Shift+Right arrow to go to the last page. |
| Tab key | In windows that have multiple tabs, use the Tab key to jump to the next tab and Shift+Tab to go to the previous tab. |
| + | You can use + to zoom in your City view |
| - | You can use - to zoom out your City view |
