Battle: Difference between revisions
No edit summary |
No edit summary |
||
| (15 intermediate revisions by 2 users not shown) | |||
| Line 1: | Line 1: | ||
[[Category:Help]] | [[Category:Help]] | ||
===Basics=== | {{Template:MenuBuildings_Overview}} | ||
===Battle=== | |||
====Basics==== | |||
Elvenar is a peaceful world! However to enforce that peace you may sometimes want to fight your way through. | Elvenar is a peaceful world! However to enforce that peace you may sometimes want to fight your way through. | ||
As it has been noted, to collect the Relics you need to improve the development of your city, you will have to scout Provinces where you will get acquainted with the tribes that possess them. | As it has been noted, to collect the Relics you need to improve the development of your city, you will have to scout Provinces where you will get acquainted with the tribes that possess them. | ||
At this point, you will be given the choice to negotiate the Relics with the Province merchant or fight the Province | At this point, you will be given the choice to negotiate the Relics with the Province merchant or fight the units in the Province to get them. | ||
[[File:Inside Province.png|center]] | [[File:Inside Province.png|center]] | ||
In each Province you will find an army which will vary, depending on the Province type. The further away you go from your city, the bigger the army in the Province will become and the more complex the combination of its troops will be. As with your own units, the number of troops in each Province squad will depend on each unit weight. | |||
[[File:Army-Size.png|center]] | [[File:Army-Size.png|center]] | ||
====Combat Pentagon==== | |||
The [[Units#Units_Overview|units]] in Elvenar have strengths and weaknesses against other units, since there are 5 unit types in Elvenar there is a Combat Pentagon that helps show these strengths and weaknesses. | |||
[[File:Combat_Pentagon.png|center]] | |||
As it can be hard to grasp the Pentagon if you don't know how it works, to explain the Combat Pentagon there is the image down below. | |||
[[File:Combat_Pentagon_explained.png|center]] | |||
In this example the chosen unit type is Heavy Ranged. The green, outgoing, arrows represents the units which a Heavy Ranged unit is strong against. In this case it's Light Ranged and Light Melee. | |||
The red(incoming) arrows represents the units which a Heavy Ranged unit is weak against. In this case it's Mages and Heavy Melee. This example can be applied for any unit type by just looking at the incoming and outgoing arrows of that type. | |||
=== Army Setup=== | === Army Setup=== | ||
To prepare for battle you will first need to train your troops in the Barracks. Once you have a big enough army you will be able to fight your way to collect Relics and finish encounters and tournaments. | |||
Right before you start to battle you will need to set up your army. On the battlefield, each unit type will be grouped into Squads.The Squad Size of your troops will increase with each 'Squad Size Upgrade" you unlock in the Research Tree. You will be able to place between 1 and 5 Squads on the battlefield, right from the start. So remember: The more the merrier! | |||
[[File:Setup_Army.png|center]] | |||
[[File: | It is important to choose the right units to fight against the enemy to make sure you pull in a victory. | ||
While you hover your mouse of a unit you will see against what enemy units your unit is good or neutral because the enemy unit will have their class image shown on them. | |||
If you hover your mouse longer over your unit you will also see how good your unit is against other classes based on the amount of swords you see. The more swords the better! | |||
If you need more information on why the unit is good you can look at the [[Units#Unit_Information|unit's]] details by clicking on the picture. | |||
[[File:Setup_Army_Good_Against.png|center]] | |||
| Line 36: | Line 62: | ||
By clicking on the [[File:Info-icon.png]] on your enemies' image, you will see their attributes per unit. | By clicking on the [[File:Info-icon.png]] on your enemies' image, you will see their attributes per unit. | ||
=== The Battlefield=== | |||
On the battlefield you will find the fighters already in their starting positions. The starting positions are determined by the order in which you place your troops before you go into battle. This is also the same for the enemy troops. | |||
[[File:Starting_positions.png|700px|center]] | |||
Your troops are on the left, and their range is marked in yellow. Your opponent's are on the right, and their range is marked in red. | |||
Each Squad takes one hex on the field and its movement range will be highlighted. | Each Squad takes one hex on the field and its movement range will be highlighted. | ||
[[File:Battlefield.png|700px|center]] | |||
Sometime you will also find different type of obstacles on the battlefield so you will need to develop different tactics to attack or defend. If the [[Units|units]] in the squad can attack from long range, they can of course also attack over obstacles. | |||
=== Initiative Bar=== | === Initiative Bar=== | ||
The initiative bar shows the turnorder for all units in the battle, allowing some strategic choices on which unit to attack first. | |||
[[File:Initiative_bar_exp.png|700px|center]] | [[File:Initiative_bar_exp.png|700px|center]] | ||
| Line 64: | Line 95: | ||
|align=center|2 | |align=center|2 | ||
|align=center|Finish Battle automatically | |align=center|Finish Battle automatically | ||
|This button will finish the battle automatically. Once | |This button will finish the battle automatically. Once clicked it is not possible to go back to manual mode. If you want to see the battle results immediately, just click on the “Battle Results” button at the top of the screen. | ||
|- | |- | ||
|align=center|3 | |align=center|3 | ||
| Line 76: | Line 107: | ||
|align=center|5 | |align=center|5 | ||
|align=center|Skip turn | |align=center|Skip turn | ||
| | |Click here to skip the current unit's turn. This is valid only for the current round. In the following round this unit will run his turn as usual. | ||
|- | |- | ||
|align=center|6 | |align=center|6 | ||
| Line 92: | Line 123: | ||
|align=center|9 | |align=center|9 | ||
|align=center|Enemy HP Bar | |align=center|Enemy HP Bar | ||
|This bar will show the losses in the enemy Squad. It will be full in the beginning and it will decrease as you kill | |This bar will show the losses in the enemy Squad. It will be full in the beginning and it will decrease as you kill that Squad's units. | ||
|- | |- | ||
|align=center|10 | |align=center|10 | ||
|align=center|Red Background | |align=center|Red Background | ||
| | |Enemy Squads | ||
|- | |- | ||
|align=center|11 | |align=center|11 | ||
| Line 102: | Line 133: | ||
|If you place your mouse over this icon, it will show you the units attributes and bonuses. | |If you place your mouse over this icon, it will show you the units attributes and bonuses. | ||
|} | |} | ||
Latest revision as of 23:49, 17 May 2017
|
Battle
Basics
Elvenar is a peaceful world! However to enforce that peace you may sometimes want to fight your way through. As it has been noted, to collect the Relics you need to improve the development of your city, you will have to scout Provinces where you will get acquainted with the tribes that possess them.
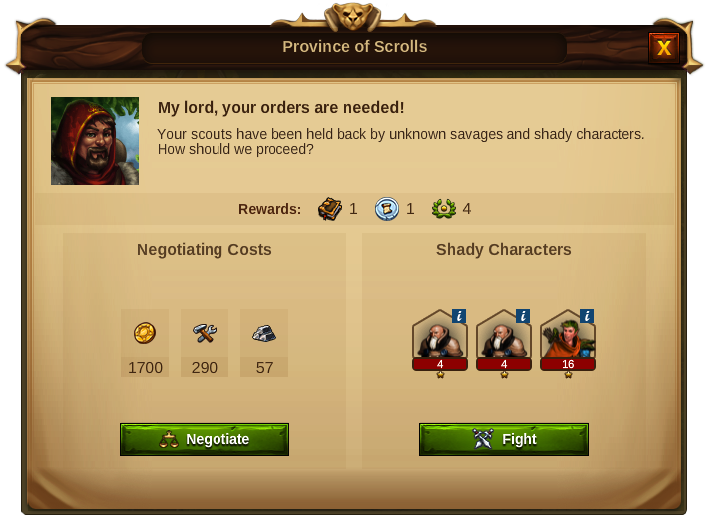
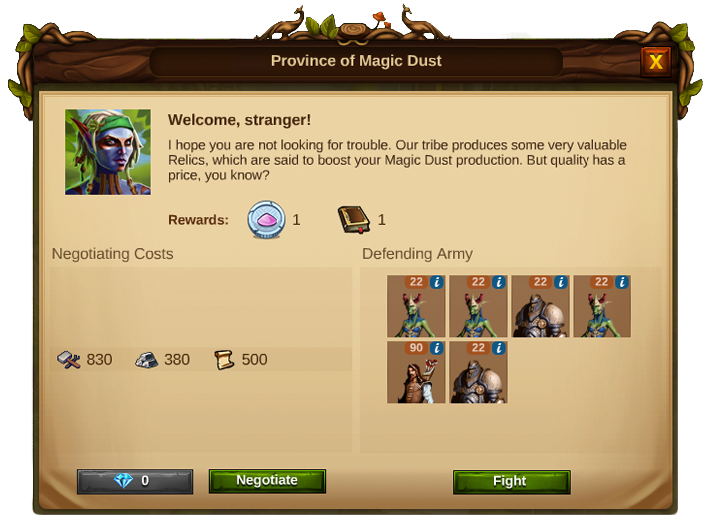
At this point, you will be given the choice to negotiate the Relics with the Province merchant or fight the units in the Province to get them.
In each Province you will find an army which will vary, depending on the Province type. The further away you go from your city, the bigger the army in the Province will become and the more complex the combination of its troops will be. As with your own units, the number of troops in each Province squad will depend on each unit weight.
Combat Pentagon
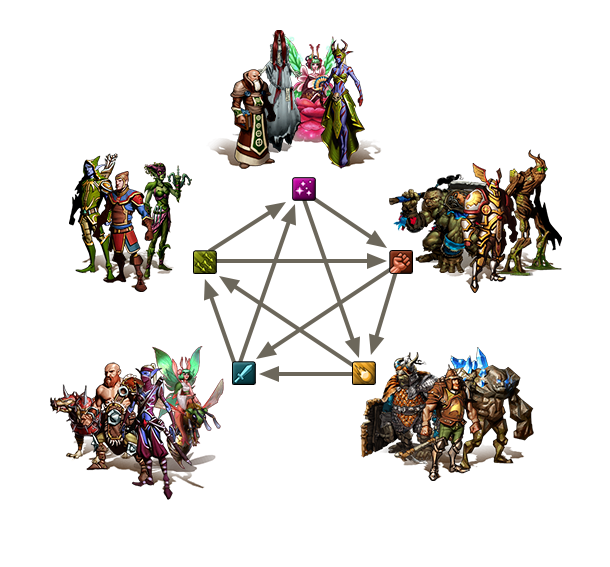
The units in Elvenar have strengths and weaknesses against other units, since there are 5 unit types in Elvenar there is a Combat Pentagon that helps show these strengths and weaknesses.
As it can be hard to grasp the Pentagon if you don't know how it works, to explain the Combat Pentagon there is the image down below.
In this example the chosen unit type is Heavy Ranged. The green, outgoing, arrows represents the units which a Heavy Ranged unit is strong against. In this case it's Light Ranged and Light Melee.
The red(incoming) arrows represents the units which a Heavy Ranged unit is weak against. In this case it's Mages and Heavy Melee. This example can be applied for any unit type by just looking at the incoming and outgoing arrows of that type.
Army Setup
To prepare for battle you will first need to train your troops in the Barracks. Once you have a big enough army you will be able to fight your way to collect Relics and finish encounters and tournaments.
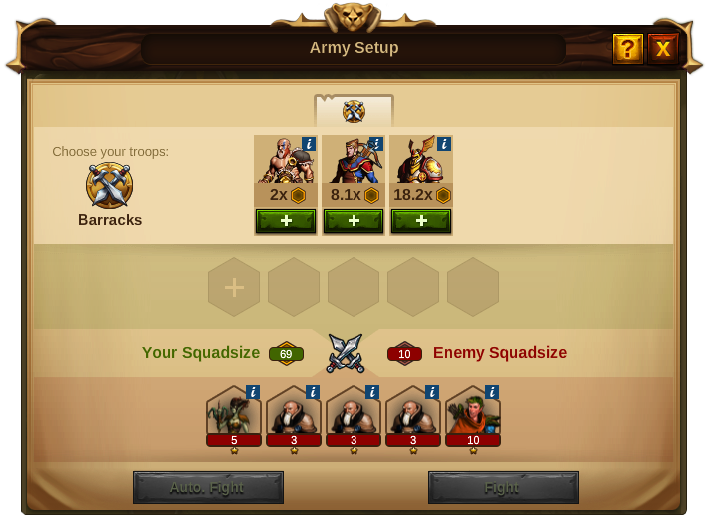
Right before you start to battle you will need to set up your army. On the battlefield, each unit type will be grouped into Squads.The Squad Size of your troops will increase with each 'Squad Size Upgrade" you unlock in the Research Tree. You will be able to place between 1 and 5 Squads on the battlefield, right from the start. So remember: The more the merrier!
It is important to choose the right units to fight against the enemy to make sure you pull in a victory.
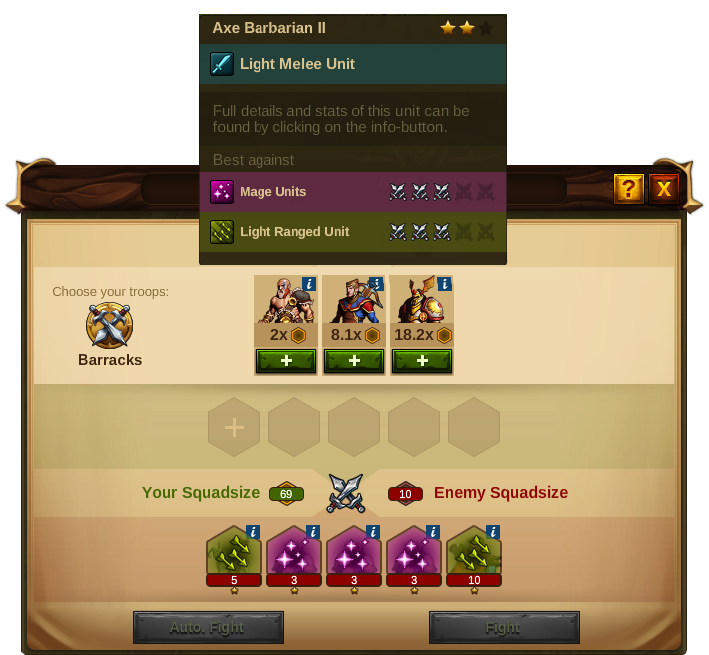
While you hover your mouse of a unit you will see against what enemy units your unit is good or neutral because the enemy unit will have their class image shown on them.
If you hover your mouse longer over your unit you will also see how good your unit is against other classes based on the amount of swords you see. The more swords the better!
If you need more information on why the unit is good you can look at the unit's details by clicking on the picture.
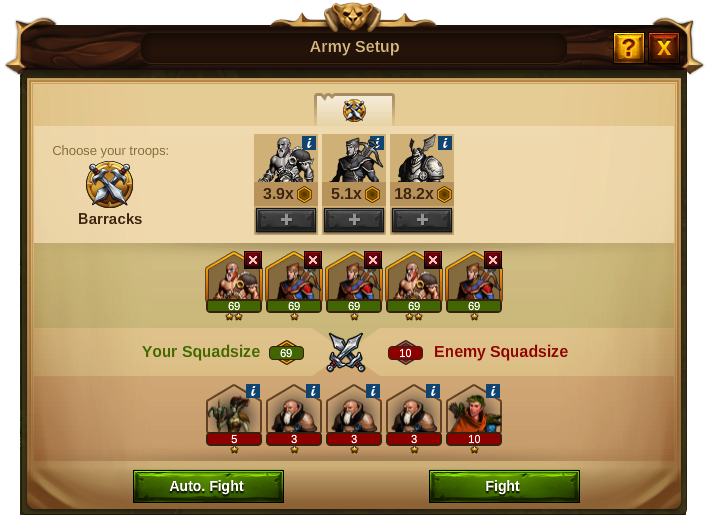
You will be able to remove Squads and replace them, as long as you haven't started the battle.
You will always place a full Squad on the battlefield unless you do not have enough units in a Squad to fill it, in that case only a partial Squad will be placed.
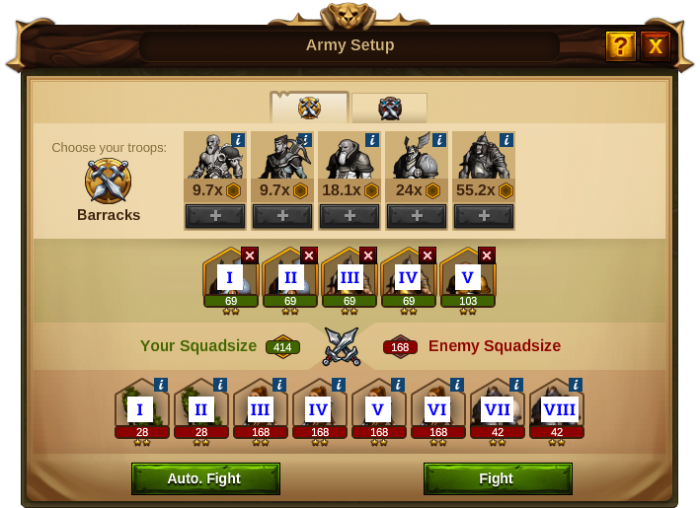
As said, the Squads have a size which will increase throughout the game: The bigger the Squad the more units will fit into it and the stronger it will be.
Your enemies will also have different Squad sizes. The Squad size of your enemies increase with each new Province you Scout and with the distance of the Province from your city!
By clicking on the ![]() on your enemies' image, you will see their attributes per unit.
on your enemies' image, you will see their attributes per unit.
The Battlefield
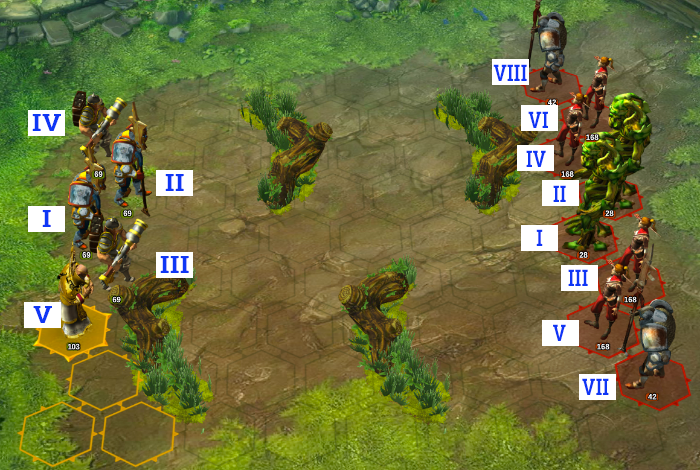
On the battlefield you will find the fighters already in their starting positions. The starting positions are determined by the order in which you place your troops before you go into battle. This is also the same for the enemy troops.
Your troops are on the left, and their range is marked in yellow. Your opponent's are on the right, and their range is marked in red.
Each Squad takes one hex on the field and its movement range will be highlighted.
Sometime you will also find different type of obstacles on the battlefield so you will need to develop different tactics to attack or defend. If the units in the squad can attack from long range, they can of course also attack over obstacles.
Initiative Bar
The initiative bar shows the turnorder for all units in the battle, allowing some strategic choices on which unit to attack first.
| Number | Name | Description |
|---|---|---|
| 1 | Surrender | If you click this button, the battle will immediately be stopped and lost. You can choose to click it at any time, to avoid additional losses. |
| 2 | Finish Battle automatically | This button will finish the battle automatically. Once clicked it is not possible to go back to manual mode. If you want to see the battle results immediately, just click on the “Battle Results” button at the top of the screen. |
| 3 | Battle Speed | Here you will be able to switch the speed of the animations from normal to medium or maximum. |
| 4 | Round | Here you will be able to see the battle round. Every time both fighters finish a round, a new one will start until the end of the battle. |
| 5 | Skip turn | Click here to skip the current unit's turn. This is valid only for the current round. In the following round this unit will run his turn as usual. |
| 6 | Player HP Bar | This bar will show the losses in the Squad. Usually it is full at the beginning and decreases during the battle, as units get killed. |
| 7 | Green Background | Player’s Squads |
| 8 | Units in the Squad | Here you will see the number of available units in that Squad. It can decrease during the battle as unit get killed. |
| 9 | Enemy HP Bar | This bar will show the losses in the enemy Squad. It will be full in the beginning and it will decrease as you kill that Squad's units. |
| 10 | Red Background | Enemy Squads |
| 11 | Unit Information | If you place your mouse over this icon, it will show you the units attributes and bonuses. |
